
 The watercolor markers on glossy cardstock was a technique that I traveled all the way from Kansas to Minnesota to learn from a wonderful woman by the name of Laureen Crooks. This was before the Copic marker coloring craze and it baffled many as to how she made the color look seamless on glossy cardstock.
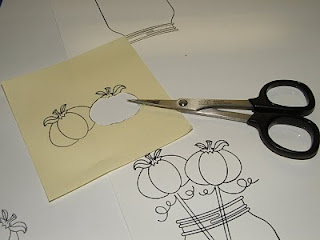
Now, you will lay the mask over the image. Latex spones are the key to the next step. You color on the sponge with the marker. Tap on scrap paper first---then slow add color to your image. Remember to start light...you can always add color but you can't take it away once it is on the paper.
 Continue adding color until you have the desired saturation. After the first color is on, add a second color that is a shade or two darker to the edges of the image. Do this again with a third and darker color. To smooth out the color, use he lightest color and apply over the entire image.
 Peel away the mask. If you have little white gaps between the stamped line and your color, use the brush marker tip, with a very light hand and fill in the white space. I had to do this in a couple places here and you can't even see it. After a little practice this is a very simple technique that can help you get rid of some of that old glossy cardstock. I like using this on images that have big open spaces.
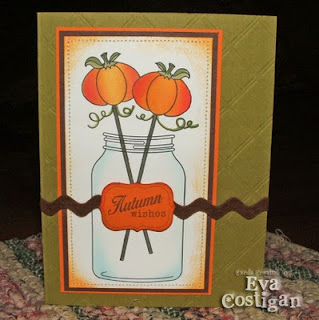
Supplies:
Stamps: PaperTrey Friendship Jar and Fall Fillers
Paper: Ripe Avocado, Orange Zest and Dark Chocolate
Other: Guidelines Impression Plate, Label Die, Sewing Machine, Chocolate Felt, Rick Rack Border and Tombow markers
27 comments:
What a fabulous technique! Thanks for the step by step photos too - great for a visual learner like me :D
Hugs,
Aimes
x
this is fabulous.. love the coloring1
Eva....this is a fun technique. Thanks for the step by step instructions! Your coloring is fantastic with awesome shading. I'm so glad you got to play along in the PTI blog hop today!!
This is lvoely. Lx
What a great technique -- LOVE your outcome!!!
great technique and a super cute card.
Eva, this is fantastic and a terrific way to color! Adorable card!
Beautiful job Eva!!! I have my eyeball card and candy on display in my studio. They are so cute!!!
AWESOME technique, Eva! Thank you for the step by step too! Your card is great and those pumpkins look like they are glowing! VERY nice.
LOVE the coloring on your pumpkins! They turned out so pretty! Super cute card Eva and a great tutorial as well!
What a great technique. I am definitely going to have to try this one.
Wow, definitely going to try this one out!
Fabulous! Love what you did with the pumpkins. I have this set too and love it. :)
What a totally gorgeous card! I love the layer of ric rac - but your colouring really steals the show! Great tutorial on masking - you did such a precise job on your card - just beautiful!
beautiful card and nice tutorial too.
OMG! I don't have but LOVE this stamp set! I think its just the coolest! What a wonderful card! The pumpkin coloring looks awesome!
Oh awesome coloring and thanks so much for the picture tutorial! Such an adorable card!
Wow, they look perfect! I wonder if I can get this to work, lol lol!!!
your coloring is gorgeous! thanks for the tutorial!
Really cute card! I love the coloring!
This rocks!
What a wonderful technique!!!! Fantastic card!!!!
Great card and technique!
Cool techniue, and great idea giving the step by step instructions, thanks for that, cute card!
Love coloring on your beautiful card. This is a new technique to me and you explained it very well
WOW this is fabulous!!! Your coloring with the sponging is incredible and I love the embossed BG and rick-rack trim!
love this technique...beautiful effect!
Post a Comment